
How To Make a Wiffle Ball Field in your Backyard (With Sketch Drawings and Diagrams)
Contents:
1) Layout of Wiffle Ball Field and Dimensions
2) Skinned Areas and Line Markings of a Wiffle Ball Field
3) Planning The Field
4) Clearing the Site, Setting Out Levels , Site Measurements and Drawings
5) Setting Out the Field Orientation/Centreline
6) Setting Out and Marking the Home Plate, Bases, Pitching Plate, Foul Lines and Skinned Areas
7) Stripping Turf in Skinned Areas and Filling with Clay
8) Installing the Home Plate, Pitching Plate and Marking Batters Boxes

Wiffle Ball Field_Layout Isometric View
Wiffle Ball is a game that is derived from baseball, basically one of the many variations of the game, sharing many rules with baseball, with a few differences here and there. The similarities and differences apply to both the game play and the field layout. A minimum of two players is required to play the game for recreational purposes, but for league tournaments, 4 to 6 players per team are often required, with 8 to 10 people being allowed on the team roster for substitutions and role switching. A six-a-side wiffle ball team has 4 fielders, one catcher and one pitcher, while a four-a-side wiffle ball team has 2 fielders, one pitcher and one catcher. Wiffle ball makes use of a lightweight plastic ball with eight oblong holes, optimized for curving when thrown in the air across the field, while baseball makes use of a hardball.
Wiffle Ball is a type of mini-baseball improvised for small and confined spaces which don’t have room for larger outfields, thus this game is commonly and particularly played in the streets, backyards and indoor sports fields. The difference between a baseball field and wiffle ball field is that:
- Wiffle ball can be played on almost any type of surface such as natural grass, synthetic turf, dusty ground, asphalt or concrete.
- A wiffle ball field has a flat pitching circle with no mound or elevated area. Thus the pitching circle and home plate are at the same level.
- A wiffle ball field can have up to 5 zones demarcated by arcs, of which the dead zone (bunt zone), single zone and double zone are often mandatory in a field with 85-foot long foul lines on the left and right wing of the field. A much larger professional league field with 95-foot long foul lines or more will accommodate the triple zone and home run area.
- Just like a baseball field, you can have a backstop fence on a wiffle ball field, but a wiffle pitch backstop has a strike zone, a rectangular hole 22×30 inch high cut out from the backstop. The strike zone is positioned directly behind the home plate along the field centreline (line passing through the home plate and pitching plate) at a height of 12 inches above the ground level. Instead of cutting the strike zone out of the backstop fence, you can have a free-standing strike zone that looks like a fixed or moveable billboard, with its legs embedded in or anchored to the ground.
-

Strike Zone on Backstop_Diagram – Wiffle Ball Field

Home Plate_Batters Box_Strike Zone – Wiffle Ball Field
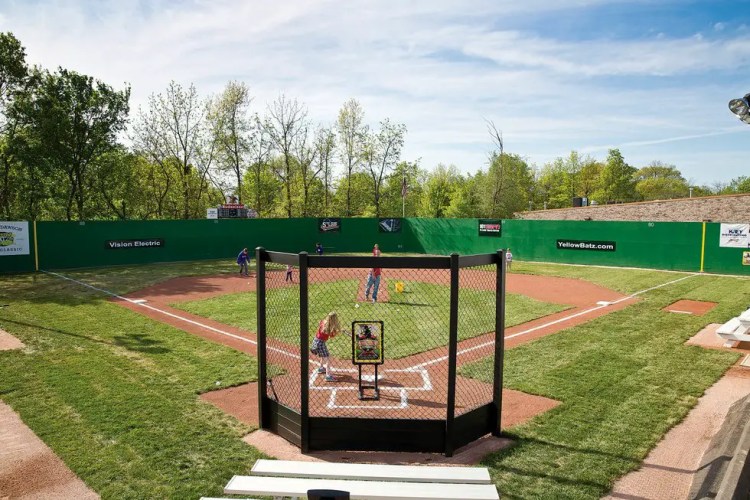
YellowBatz Wiffle Ball Field – Natural Grass Pitch located in O’Fallon, Missouri – Source: STLMAG
Layout of Wiffle Ball Field and Dimensions
The layout, size and construction design of your pitch will depend on your requirements. Are you a building a residential backyard wiffle ball field, community recreational club pitch or a wiffle ball pitch for regional and national league tournaments? If you have ever looked at the types of pitches out there, they don’t necessarily satisfy all the rules laid out by the WWA (World Wiffle Ball Association) or WWBC (World Wiffle Ball Championship). As an example, the Little Fenway (Essex Vermont), Little Wriggley and MLB Central Park wiffle ball fields have a pitching mound instead of a flat pitching circle. Depending on the tournament rules, the distances between the bases, home plate to foul pole, home plate to dead zone arc, home plate to backstop and/or between the home plate and pitching plate may vary as well. It should be noted that Wiffle Ball is mostly played for recreational purposes. It’s not strictly and centrally regulated at a professional level like baseball and football for example, which have national /professional standard codes and rules.

Sketch Drawing – Wiffle Ball Field Layout and Zones
Anyway, what you should know is that a full and complete wiffle ball pitch has the following areas and zones:
- The infield square formed by the home plate and 3 bases (1st,2nd and 3rd base) at the corners. The sides (baselines) of the infield square are 35 to 45 feet long, so the corner bases will also be spaced at this distance. The distance between the home plate tip and centre of 2nd base, which is the diagonal line of the square passing through the pitching plate, can be calculated using the Pythagoras theorem. In this case, an infield square measuring 35×35 feet will have a diagonal line of 50 feet. The corner bases are 3-inch thick white square rubber tops, 15×15 inches wide, anchored on a concrete base.
- The bunt zone (dead zone) inside the front-end of the infield square, which is an arched area enclosed by the left and right foul line, with a radius of 20 feet emanating from the tip of the home plate.
- The home circle containing the home plate, placed between the left and right batter’s boxes. The home plate is a 5-sided white rubber with a rectangular and triangular end, measuring 17×17 inches overall, the rectangular end is 17×8.5 inches, and the triangular end has a base width of 17 inches and height of 8.5 inches. The batter’s box is 6×4 feet wide, drawn and marked on the ground with paint.
- The backstop fence or strike zone (a vertical board 22×30 inches high) placed 3 feet (914mm) directly behind the tip of the home plate along the field centreline, and 12 inches above the ground.
- The pitching circle is located inside the infield square along the field centreline running from the home plate tip to the centre of 2nd A coloured circle or square 3 feet in diameter is usually used for the pitching area, marked on the ground with paint or skinned. A white rectangular pitching rubber, 24×6 inches wide x 3 inches thick, is installed in the centre of the pitching circle, with its front face behind the perpendicular diameter. The dimension of interest is the distance from the front face of the pitching rubber to the tip of the home plate. This distance depends on the size of the infield square. In a pitch with a 35-feet infield square, the distance from the front face of the pitching rubber to the tip of the home plate is about 42 feet. In a pitch with a 42-feet infield square, the distance from the front face of the pitching rubber to the home plate tip will be about 39 feet. Note that the distance of the pitcher’s rubber plate from the home plate depends on tournament rules and league level (i.e. junior or senior level).
- Foul Lines, Foul Poles and Outfield: The tip of the home plate is the origin of foul lines on the left and right side of the field. The left and right foul lines are perpendicular to each other, running from the home plate to the edge of the field marked by a Foul Pole. According to WWA rules, the minimum distance of the foul lines from the home plate to the foul pole is 80 feet, and the maximum is 105 feet.
The distance between the centre of the Triple Zone Arc to the tip of the home plate shall be a minimum of 95 feet, and maximum of 125 feet.

Wiffle Ball Field_Layout Isometric View
- Arched Zones: A wiffle ball pitch has 5 arched zones or areas:
Bunt Zone (Dead Zone) – The dead zone arc meets the left and right foul lines at 20 to 24 feet away from the home plate. The dead zone arc may be as low as 15 feet depending on the size of the infield square and requirements.
Singles Zone – The singles zone bottom arc meets the left and right foul lines at 20 to 24 feet away from the home plate. The upper arc meets the left and right foul lines at 42 to 48 feet away from the home plate.
Doubles Zone – The doubles zone bottom arc meets the left and right foul lines at 42 to 48 feet away from the home plate. The upper arc meets the left and right foul lines at 64 to 65 feet.
Triples Zone – The triples zone bottom arc meets the left and right foul lines at 64 to 65 feet. The upper arc meets the left and right foul lines at 85 feet.
Home Run – The home run area is the zone outside and over the Triples Zone upper arc. Sometimes, the outfield fence may run along the upper arc of the Triples Zone, and in this case, a fly ball crossing the Triple Zone arc will be a home run.
Note: Some of the dimensions given above are ranges, meaning you can adjust the subsequent positions of other zones or arcs as required.

Wiffle Ball Field at The Fort, Blue Jack National – Artificial Turf Pitch – Source: BlueJackNational
Skinned Areas and Line Markings of a Wiffle Ball Field
Depending on whether you are building a wiffle ball field for your backyard, sports club, community recreational facility or league tournaments, you can have a natural grass field with skinned clay areas or just paint line markings. For your private single-family home backyard, you might want a simple wiffle ball pitch with paint line markings because it preserves the condition of your existing backyard lawn, i.e. you won’t need to dig up or rotovate (scarify) patches of your existing lawn to make way for skinned clay areas. Paint line markings made with aerosol athletic field paint are temporary, so they don’t affect or modify the ground conditions. However, if you have decided that you want a permanent natural grass wiffle ball field with skinned areas in your backyard, you can go ahead and make it, following the detailed baseball field construction guidelines discussed in the previous post. If you can build a baseball field, making a wiffle ball field is just a walkover.
Alternatively, an outdoor or indoor wiffle ball pitch can be made from artificial synthetic turf. Although synthetic turf needs highly specialized installation, and the initial costs are usually high, there are many benefits derived from this turf. Artificial turf grass will be cheaper in the long run because it is resilient, tough and durable, doesn’t wear out as natural grass, and maintenance costs are extremely lower than natural turf because the turf doesn’t need to be watered, mowed, fertilized, weeded, thickened or patched with new grass or sod. An artificial turf wiffle ball field can hold tournaments throughout the year, unlike a natural grass pitch which holds matches on a seasonal basis because of the grass conditions.
An artificial grass pitch has no skinned areas, with paint line markings being preferred in most cases. However, depending on your requirements, you can still mimic “fake” skinned areas on a synthetic grass carpet. The Blue Jack National Wiffle Ball Field is an example.
In a natural grass field, the skinned areas are the clay areas surrounding the infield square along the base lines. The pitching mound, home circle as well as the foul line path on the left and right side of the infield square are also clay areas. Inside the pitching circle and home circle, the footing lane(box) inside the circle should be fortified with bagged clay or clay bricks to resist wearing out, as these are high traffic areas.

Wiffle Ball Field_Layout Isometric View
How To Build a Wiffle Ball Field
Planning The Field
Design: Decide if you want a temporary or permanent wiffle ball pitch. A temporary field is faster, easier and convenient to make because you only need to mark the turf with removable aerosol athletic field paint. So your foul lines, pitching circle, infield square, bases and batter’s boxes will be marked with paint, without structural modification to the lawn or ground.
If you are building a permanent pitch, you will need to make structural alterations to the lawn and ground. This will involve digging up and removing the sod for skinned areas, and filling the areas with clay. Your corner bases (1st, 2nd and 3rd base) will be real ones, 15x15x3 inch thick white rubber tops, anchored to concrete bases in the ground. When building a permanent wiffle ball field, it’s often desired to make it as aesthetically pleasing as possible, so go on and be creative, it may be the next Little Fenway for your community.
Location and Site Drainage: You have to find a suitable location in your backyard to build the field. The site on which the field is built should be flat and level. If not, then it should be graded and levelled. To ensure quick and efficient drainage, the field should be sloped at suitable gradient that allows surface rainwater to drain away quickly to the perimeter of the yard (water collection line or point). The water collection point is usually a U-shaped drain channel or trench which sends surface rainwater to a catchpit or ditch.
Grading the field at a suitable slope is one method of ensuring quick drainage, which is quite affordable and practical for your residential backyard. However, regulated fields for professional tournaments often make use of sand-rootzone fields to achieve adequate drainage. A sand-based natural grass field drains surface rainwater much faster than a clay or native soil field. Because of their drainage efficiency, sand-based fields can be built flat and level at zero gradient.
Field Orientation
The advantage of making a wiffle ball field with paint markings instead of making a field with skinned clay areas is that paint markings are temporary and removeable while skinned clay areas are permanent features. This means you can change the orientation of your field as you like if it has temporary markings, but can’t do so if it’s a permanent field with skinned clay areas.
The orientation of your field will depend on the time of the day that you often play games. Whatever time of day you choose, just make sure that the sun is behind the players or out of the line of eyesight during the game. If you are going to be playing games in the afternoon and dusk, then you should choose the East to North-East direction as your field orientation.
Site Investigations
Before you commence any construction activity or excavation, you must investigate your site or backyard. Call the 811 Dig Safe Number in your city or state, to get utility operators to locate and mark the position of underground services on your yard. There may be sewer lines, water supply pipes, gas pipes or electrical/telecommunication cables laid under your backyard. You will never know their existence or location until you get utility operators to locate them. Digging holes in your backyard without getting permission from utility operators is not just illegal, but you can cause damage to the unknown / hidden pipes, which may in turn cause a flooding, fire, electrocution or air poisoning hazard.
Clearing the Site, Setting Out Levels , Site Measurements and Drawings
Assuming you have virgin land on your private property with wild vegetation, bushes and rough terrain, you will first need to clear the site of all vegetation, grass, bushes, trees, shrubs, including grubbing up roots, removing tree stumps, debris, rocks and rubbish. After this, you have to set out levels on the site using profiles and stringlines. Using the profiles and stringlines as your guide, excavate the site, stripping the topsoil to the required datum level or benchmark on the private lot. Details about building a baseball field from scratch and setting out levels are given in the previous post.
If you are not building a wiffle ball field from scratch i.e. you have an existing lawn in your backyard, then your work is half done. Pick a flat and level area on your lawn to build your pitch. First, measure the size of your backyard using a laser measure, it’s faster than using a measuring tape. From the length and width of your backyard, you can determine the maximum size of your wiffle ball pitch. Find a suitable size that can fit within your backyard and big enough to enjoy the game. The requirements can be determined by transferring your backyard measurements on a CAD program like Google Sketchup or AutoCAD. Open the CAD program and draw the site plan to scale based on your site measurements. Draw the wiffle ball infield square with its corners defined by the Home Plate, 1st,2nd and 3rd Base. From the Field Layout guideline provided earlier in this post, we are going to draw a 45×45 feet infield square, with a pitching plate to home plate spacing of 39 feet.
Mark the home plate (H) on your field sketch design, then draw foul lines projecting a distance of 80 feet from the home plate (H), on both sides. According to our Field Layout guideline, 80 feet is the minimum distance of the foul lines from the home plate to the foul pole. Draw an imaginary line joining the left and right foul pole. Using this imaginary line as the baseline, draw an imaginary rectangle that meets the home plate, such that the longitudinal side of the rectangle is equal to the distance between the imaginary baseline and the home plate. This rectangle defines the overall minimum regulated size of your wiffle ball field, the limit being set by the minimum regulated distance of the foul lines from the home plate to the foul pole.
Just by looking at the size of this rectangle with respect to the site plan (backyard size), you can tell if the wiffle ball pitch can fit in your backyard. If you have plenty of space in your backyard to accommodate the pitch, extend the foul lines to give you more room for the Triple Zone and Home Run Area, and push back the rectangle towards the strike zone to open more room.
Setting Out the Field Orientation/Centreline
Let’s assume that the field centreline running through the centre of 2nd Base, pitching circle and home plate, is in the East to North-East direction. We have to set out the position of this centreline on the pitch. To do this, we have to employ compass surveying or orienteering. Put a stake or steel pin on the centre of the field (C). Take a nylon string with looped ends on both ends and hook one end on the stake (C). Hold the other end (E) and extend the string, making sure that the string is taut and level with the ground (horizontal plane).
When a compass is held or laid flat on a horizontal plane, the compass needle stays pointing to the Magnetic North all the time, even when you turn the compass around. Hold the compass in front of you, and place the compass under the string, so that its top face is touching the string.
While holding the string with one hand and the compass in another hand under the string, move around in a circle, turning the string about the stake, until the string is aligned with the ENE (East NorthEast) direction. The compass needle as always should remain pointing towards the Magnetic North as you turn the string about the stake/steel pin (C).
Hook the string-end (E) on a steel pin and drive the steel pin into the ground to mark this position. Now you have a stringline on the ground running from point (C) to point (E). This line C-E is the field orientation i.e. the field centreline running in the East NorthEast direction. Project and extend the centreline to both ends of the field using chalk or aerosol athletic field paint, and keep the stringline in place.
Since the Magnetic North and True North are not in the same line or axis, you have to adjust the compass for magnetic declination or variation to find the True North. The magnetic declination or variation is the angle between the Magnetic North and True North. Adjust the compass for magnetic variation before setting out the field.
Setting Out and Marking the Home Plate, 2nd Base
The home plate (H) and 2nd base (B2) are located on the centreline of the field. We are going to make a 45×45 feet infield square, with a pitching plate to home plate spacing of 39 feet. To calculate the distance between the home plate (H) and 2nd base (B2), we should divide the infield square into two triangles with a diagonal line, and then use the Pythagoras Theorem to find the distance H-B2 (the hypotenuse). So our identical triangles have sides with dimensions 45, 45 and X = unknown side. We have to calculate X, and X=63.64 feet in this case. So the distance H-B2 is 63.64 feet.

Home Circle_Batters Box and Home Plate Diagram – Wiffle Ball Field
The home plate should be located on one end of the centreline. On this point (H), drive a steel pin or stake into the ground. Roll out a measuring tape, and hook one end on stake (H). Extend the tape along the centreline and mark the point (B2), 63.64 feet away from (H), with a steel pin or stake.

Second Base_Diagram Detail – Wiffle Ball Field
Setting Out and Marking the 1st and 3rd Base
A detailed method of setting out the 1st and 3rd base is given under the baseball field construction section.

First Base_Diagram – Wiffle Ball Field

Third Base_Diagram – Wiffle Ball Field
Setting Out and Marking the Pitching Circle
Setting out and marking the position of the pitching circle (18 feet diameter) is easy because we know that the distance between the home plate and pitching plate is 39 feet, and the front face of the pitching plate is behind the centre of the circle, just touching the diameter of the circle.

Pitching Circle_Rubber Plate_Diagram – Wiffle Ball Field
Drive in a steel pin on the centre of the pitching circle (P). This point is 39 feet from the home plate, along the field centreline. Take a 9 foot string or measuring tape with looped end. Hook the looped end on the steel pin and extend the tape so that it’s taut and level with the ground. Hold the 9-foot mark on the tape and scribe a circle about the steel pin. You have just created an 18-foot diameter circle. Since you are marking the circle on green grass turf, you should scribe the circle using white aerosol athletic field paint.
Setting Out and Marking the Home Circle
The home circle is the area containing the home plate and batter’s boxes. The tip of the home plate (H) is the centre of the home circle, which is 26 feet in diameter. To set out the home circle, drive in a steel pin or stake on point (H). Hook the looped end of a nylon string or measuring tape on the steel pin and extend the tape along the horizontal plane. Hold the 13-feet mark on the tape and scribe a circle about the pin with white aerosol athletic paint.
Setting Out the Foul Lines and Foul Poles
A detailed method of setting out the foul lines and foul poles is given under the baseball pitch construction section. There are foul lines on the left and right side of the field, emanating from the tip of the home plate, and running perpendicular to each other from the point of origin, at a bearing of 45 degrees from the centreline.
According to WWA rules, the minimum distance of the foul lines from the home plate to the foul pole is 80 feet, and the maximum is 105 feet.

Wiffle Ball Field_Infield Bases_Foul Lines and Baselines
Setting Out and Marking Skinned Areas
The skinned areas in a wiffle ball field are the same as those in a baseball field. These are the pitching circle, home circle and the periphery of the infield square. The home circle and pitching circle have already be marked. We need to set out and mark the peripheries of the infield square (the edges of the foul lines as well as the top arc over 2nd base).
The grassed infield square has arched corners with a radius of 9 feet, originating from the centre of the corner bases. Note that we have the imaginary infield square (45×45 feet) bounded by baselines, encircling the inner grassed infield square which is at an offset of 3 feet (914mm) inside the outer square. So the overall size of the inner grassed infield square is 39×39 feet.
Set out and mark the grassed infield square (39×39 feet) on the pitch with steel pins and stringlines, then mark the lines with white aerosol athletic field paint. Since you already have the imaginary infield square (45×45 feet) marked on the pitch, you should use the corner bases to set out and mark the arched corners of the grassed infield square. Drive a steel pin on each corner base. Take a nylon string or measuring tape and hook the looped end on the corner steel pin. Extend the tape along the horizontal plane and make sure it’s taut and level with the ground. Hold the 9-feet mark on the tape and scribe a circle with white aerosol athletic field paint. The scribed arcs / circles will intersect with the 39×39 feet square, cutting out a 9-feet radius arc on each corner.
At this stage, we have the 45×45 and 39×39 feet infield squares marked on the pitch. Our next step is marking the outer peripheries along the foul lines. The outer edges (grasslines) are at an offset of 3-feet (914mm) from the foul lines. Set out the outer edges with steel pins and stringlines, and then mark them with white aerosol athletic field paint.
Finally, we have to set out the arc over the 2nd base. This arc intersects with the foul lines on the left and right side of the infield square, with its radius (45 feet) originating from the centre of the pitching circle. Drive a steel pin on the centre of the pitching circle. Take a measuring tape with a looped end, and hook it over the steel pin. Extend the tape horizontally. Hold the 45-feet mark on the tape and scribe an arc which intersects with the foul lines using white aerosol field paint.
We have finished setting out and marking the skinned areas on the pitch. The next step is stripping the natural grass turf using a sod cutter machine.

Wiffle Ball Field_Infield Bases and Home Plate
Stripping Turf in Skinned Areas and Filling with Clay
Following the stringlines and white paint lines on the turf pitch or backyard lawn, use a sod cutter to strip the grass turf within the skinned areas. A push hand driven turf cutter is a machine that strips a layer of natural grass turf to root level, so that the turf can be rolled and loaded onto a truck for disposal or carted away using wheelbarrows. It can strip turf in 12, 16, 18, 20 or 24 inch widths, and the strip depth can be adjusted accordingly. The advantage of using a sod cutter over a scarifying machine, tiller or spade is that a turf cutter machine will neatly remove the layers of turf without mixing it up with soil or breaking it into pieces. When turf is scarified or tilled, it breaks into pieces, mixing up with soil and making it hard to separate.
How much does a sod cutter cost? The cheapest sod cutter starts from $1,800, with high-end ones at $4,500 and above. Heavy duty sod cutters are the most expensive, from $12,300 and above. Like most construction machines, the most affordable option for your home outdoor needs is to hire the sod cutter. Sod cutter rental pricing depends on the minimum charged time (hours or days). HomeDepot rents out sod cutters from $71 per 4 hour minimum ($17.75 per hour) or $102 a day.
After stripping the skinned areas, use a push hand-driven lawn edger to neatly cut the grasslines into perfect edges. Take a hula hoe and scrap off the pieces of grass under the grasslines, then rake up the lawn scraps for carting away to a dump site.
Add and spread imported soil (native soil or native soil/sand mix) inside the skinned areas to make up new surfaces. Rake and level the surface, then compact the surface to 95% Mod. AASHTO density using a vibratory roller and/or rammer. Finally, you should add a finishing layer of red or deep-red clay. Spread and level the clay soil on site.
Install Home Plate, Pitching Plate and Mark Batters Boxes
Bury the home plate and pitching plate in their positions on the pitch, so that the top face of the plates is level with the ground. Using lime paint, mark the positions of the batters boxes inside the home circle.The batter’s box is 6×4 feet wide, positioned on the left and right side of the home plate as shown in the diagram. Refer to baseball pitch construction for more details.

Wiffle Ball Field_Strike Zone on Backstop_Diagram
Install the Strike Zone
The strike zone is a vertical board (e.g. plywood) size 22×30 inches high, which is placed along the field centreline, 3 feet (914mm) behind the tip of the home plate, and standing 12 inches above the ground. The strike zone may be a free-standing board or part of the backstop. If it’s part of a backstop, then the backstop must conform to the same spacing rules as the strike zone, i.e. it must be positioned 3 feet (914mm) behind the tip of the home plate.

Wiffle Ball Field_Strike Zone on Backstop_Diagram
Your wiffle ball field is complete. Hooray!!!
Related Posts:
- How To Build a Wiffle Ball Field in your Backyard…
")
- How to Build a Baseball Field – Natural Grass Pitch…
")
- How to Build a Baseball Field – Natural Grass Pitch…
- Height of Collimation + Rise and Fall Land Survey…

- 3 Types of Land Survey Field Notebooks / Level…

- Height of Collimation + Rise and Fall Land Survey…

- Traverse Land Surveying Field Notebook / Level Book…

- Office Tools and Furniture for a Construction Cost…

- Office Tools and Furniture for a Construction Cost…


